Many politicians strive to appear patriotic in a feeble attempt to gain votes which is understandable. This is generally because it’s frowned upon for someone so prominent and wanting to lead their respective country to not be patriotic and go on about how they believe in x country.
However I don’t like the idea of patriotism, firstly as I think that patriotism leads to nationalism which causes wars and intolerance in general. Just look at Nazi Germany, the ‘patriotism’ of the Nazis quickly spiraled into book burning, then suppressing Jews and other minorities, then the holocaust.
I also don’t like patriotism as I find it quite narrow minded. This is because, I think that too often people seem to forget that we are collectively the world and this is going to sound quite socialist but I think we should move forward as one and not in separate groups. For example climate change is a global event and so it would seem logical that it’s tackled on a global scale however while that is in some aspects happening with the EU and G8 there still is a disparity between the adoption of renewable and clean energy sources.
I don’t hate patriotism I just think that it’s not that great and I’m not overly proud of being British not just because of our imperialistic and slave trade heritage but because I don’t agree with the premise of patriotism.
Category Archives: Uncategorized
Why scratch is overused
Firstly let me say one thing, I think scratch is a good little tool to get people into programming, however I think it is overused because when I did scratch/programming in I.T we only did Scratch, we didn’t move onto any programming languages after everyone was comfortable , we just did Scratch, nothing else.
So I think that my school and schools all over the U.K are misusing scratch as scratch wasn’t designed to replace traditional programming as you can’t export a normal .exe file, it was just designed to get people into programming. There were quite a few people in my class who really did enjoy scratch but they never moved onto an actual programming language like Python or C, probably because they had no idea how to start it or that it isn’t too difficult to learn. I’m sure that if they did start teaching programming right after scratch then quite a few people would of found it difficult, but school is meant to be difficult, it’s meant to challenge you to let you learn new things, not just let you sit on your arse all day and learn nothing new.
I’ve got another example of simple WYSWIG drag and drop type editors being used in school, when my class was learning how to make websites using Microsoft Expression Web, so everyone including me got along dragging and dropping elements onto the page, but I hated the software so I shut it down opened Dreamweaver and started writing my website, and I did have to teach my self quite a bit of JavaScript and some CSS but I ended up with a website that I was quite pleased with, not only because I thought it looked quite nice but I learned lots of useful CSS and JavaScript, but when people who were using Expression web asked me “how can I do something” I had no idea how to do it using the GUI sometimes I just didn’t know how to do it but more often than not you physically cannot do it without going into the actual code of the website, and when I did that everyone was very scared at the code because it was filled with loads of WYSWIG junk code and they simply had no idea what any of it meant as they weren’t taught what them clicking lots of buttons on the GUI would actually do to the code and as a result them seeing the code, I’m sure they joined the club of people who think that all forms of programming is way too difficult for everyone, so they never look into it. Which is a real shame.
So while I think scratch is a useful tool to get people interested in programming in schools, teachers must take the extra step and actually teach them how to program, as I think when the people in this generation are working there will be a huge lack of programmers, which lots of I’m sure quite a few people would be surprised at, as many people call this generation the “Technology native generation” but I think that label is false, sure if you give an iPad to most kids they’ll be playing games in minutes but they don’t actually understand how those games work and they have no interest in looking into it, so I think people should stop calling this generation “technology native” as that label is wrong, the people who grew up with the first computers that run DOS are “Technology native” as they understand how computers work, not this generation.
Receipts wasting paper
Today I went to Southampton with my family and I bought a book which looks quite interesting, but this post isn’t about me buying a book otherwise it would be quite a boring post. What this post is about the essay of a receipt I got which measures a whopping 30 Cm, and it isn’t as if I went out and bought 100 books I bought 1 book so why is it so long and just in case you don’t believe me then here is the receipt:

What this is, is blatant wasting of paper and I know that some of you will be thinking, “why the f*** is this guy winging about having such a big receipt”. Well I’m “winging” about it because if I got such a big receipt then other people will get big receipts and Waterstones is a big retailer probably the main book shop in the U.K with over 100 stores so there are going to hundreds of thousands massive receipts which is going to waste massive amounts of paper, the amount wasted could even be measured in Km’s. Wasting this much paper is a drain on our natural resources and increases the amount of paper in use, so increases the demand for new paper which means more deforestation. As a result of this there will be less trees to take in all the CO2 that we produce, so by wasting this much paper Waterstones are basically saying “Pfffft who needs the environment”.
I’m not saying that they should get rid of receipts all together but they could shorten them by half if they removed all the unnecessary line spacing, the “Pin verified” box, the VAT summary and, the bit that says “Please debit account..”as I think it’s fairly obvious that it’s £7.99 as it says the total at the top.
But what would happen if Waterstones and possibly even many major shops got rid of receipts for little transactions like my book transaction or if you just bought a pencil sharpener? I would predict that not that much would happen as how many people actually hold onto receipts if they just bought a 99p pencil sharpener, I would say that number would be pretty close to 0, so why bother getting a receipt if your just going to throw it away?
But I also have another Idea for getting rid of paper receipts completely, by making them electronic. So for example if you are lucky enough to of just got a new TV at Currys and you paid with your Credit/Debit card, then Currys would automatically email you that receipt when you paid with your Credit/Debit card. This idea would work so when you input your PIN it would not only allow X amount of money to be withdrawn, it would also allow the machine to see your email to send you the receipt. Now I understand this would take quite a lot of implementation, to be achieved but I think it would not only help the enviroment but it would also save retailers quite a lot of money as it would get rid of the need for receipt printers, ink for the receipt printer and the paper required.
Why I started coding, again.
At the moment I am learning to write C, for the second time. The first time didn’t go so well, as my compiler kept on stopping, and I just didn’t really feel like I was making much progress. So instead I learned HTML, CSS and a tiny bit of Javascript, and now I think I am fairly competent at HTML and CSS but I still wanted to be able to write an actual programming language as both HTML and CSS are pretty easy once you understand the basic rules.
I also have recently started learning Javascript at code academy because I only knew very little of it before. Admittedly I was a little bit sceptical of how good code academy was going to be, because I first started learning HTML on a website like that, and it took me a bit too long to learn it because I had questions that weren’t answered on the page and when I tried googiling them I couldn’t find the answer because I didn’t have the right words to describe my question. But it turns out that code academy is great it goes at the right pace, and it explains all of the functions perfectly, so to anyone thinking of using Code academy to learn to code I would definitely recommend it and I think that if I learned HTML there then I would of learned it twice as quick.
But why do I actually want to learn to write C and Javascript, well I suppose I always have had a fascination with computers from when I was about 6 and I made powerpoints just to use Powerpoint because as nerdy as it may sound I loved powerpoint (Now I hate it but that’s a story for another time). So now carrying on the nerdy trend I decided to learn C because programming is fun!
But if you don’t have a natural interest in computers then why would you want to learn to code, there is one big reason for this programming jobs generally pay pretty well and there are a quite a few jobs in the programming sector as it is growing significantly, by 30% from 2010 to 2020 in America, that’s compared to 18% for computer technicians and the average growth of each job sector is 14% in the U.S.
So it looks like programming is quite a good thing to learn.
Source: http://mashable.com/2012/09/20/need-a-job-youd-better-learn-to-code/
The problems with Facebook
I use Facebook almost every day but its got problems, lots of problems.
Recently Facebook has become mainly for people that know some funny alt codes for their “Teen swag” pages then they go grovelling on popular pages to gain more followers by telling their life story and how they’ll send them a friend request if they like their page. Then these people post posts which are utterly idiotic and just fishing for likes like this one.

The most unfortunate thing is that people take these things seriously as if Mr. Zuckerburg is watching everybody’s screens just waiting to phone up Satan to alert him of a naughty person who didn’t like this photo, so their family must burn in hell. I seriously lose my faith in humanity every time I see something like this.
Then there’s Facebook approach to “Privacy”, I think that most people know that by default Facebook lets everyone see pretty much everything about you but it’s fairly easy to change all of it, but it’s the other side of Facebook’s “privacy” that’s the main problem, them sharing your data to advertising companies and other companies. They have been sued many times because of this, one of the most recent ones was them being sued by a French consumer group for what it called “abusive and illicit” use of personal data, so they could sell users data so they could be targeted with advertising campaigns. Of course if you are one of the very few that decide to read the 5,354 words of Facebook’s privacy policy then you would presumably feel very bored, maybe even inclined to sue, which is what a French consumer group did as they said it was “illegible” and “incomprehensible” to the average users who don’t have a law degree, let alone those who liked that pizza post.
However despite these flaws people ,including me, still use Facebook because it’s pretty addictive and there aren’t any alternatives, that I know of, to it that have been as widely adopted as Facebook. I did read of something that people in the olden’ days used to do called talking to people, face to face, which could be an alternative to Facebook, but that sounds like a stupid idea, I mean where do you put the like button?
Why Latin, as a subject, is pointless
At my school we have to do Latin until the end of year 9 where we can drop it, so at the end of this school year I can say goodbye to 3 academic years of 152 Latin lessons or 7,600 minutes of wasted time (Yes I actually worked it out). Now some people will say it helps if you want to be a doctor as quite a lot of the names of bones, arteries e.t.c are Latin however we have never learnt anything like that, all we have learnt is about Caecillius being in his atrio, and I really do struggle to find a point in knowing this, especially as we have equal amounts of I.T lessons and Latin lessons (2 lessons per fortnight) as surely I.T which is only going to become more important should have a greater emphasis in the curriculum.Just as a “quick” side note I think that there should be more actual coding in the curriculum, not scratch or other drag and drop stuff(I think scratch e.t.c is great but it should be used as an intro to coding for a few lessons) ,actual coding. I learnt HTML, CSS, and a bit of JavaScript at home and it was by no means difficult and if I did have an actual teacher rather than having to trawl round the internet for answers to questions so simple that no one decided to write something about the answer to it, and it didn’t help that I didn’t no what everything was called.
One time one of my friends actually asked one of my teachers what the point in Latin is and she gave no answer that could explain why we actually do it, so if the teachers don’t know why we do it, then it really does raise the question ‘Why the hell do we do Latin?’.
Why we need to use renewable energy sources
Here’s a fact for you:
Fossil fuels are going to run out, we need an alternative
Now there are loads of alternative energy sources out there each with their own pros and cons, so there isn’t one amazing flawless energy source out there. So what we need is a variety of renewable energy sources, so we couldn’t just have solar energy, could you imagine the devastation that would happen on cloudless winter months.
But why do we need to spend money on this now?
Because if we wait too long, the prices on fossil fuels will skyrocket we will have to wait years for the infrastructure that provides the renewable energy sources to develop so in the meantime we will be paying stupidly high prices for fossil fuels, and the economy will be devastated for years
What are these renewable energy sources?
This is not a comprehensive list, for more I would visit this site
Solar power- Now I’m sure you have all heard of this, but all it does is turns energy from the sun into electrical energy that can be used for your kettle. However a large area of land is required to generate large amounts of power so many people claim that by having large solar farms you will devastate local wildlife and the views of the place however small arrays of solar panels on rooftops also can generate sufficient amounts of power to power a household
Wind Power- This probably is my favourite energy source as it can generate large amounts of power, can be used offshore, so it does not affect wildlife as much as solar power however some argue that even offshore wind farms can affect the views from beaches however in my opinion wind farms are beautiful and hopefully they will become an integral part of beach views.
Hydroelectricity- I honestly am no expert on this as there are very few hydroelectric dams in England however I will try my best. So basically all it does is release water from a dam which will turn a generator. This is one of the most efficient renewable energy source as only 10% of energy is wasted and the lakes that are formed by dams can offer tourism opportunities as they are a beautiful sight and they can be used for irrigation, swimming, and fishing. However there are high upfront costs to build dams, the dams can even lead to earthquakes if built inadequately, and finally if there was a drought then no energy could be produced
(I decided not to include nuclear power as it is not truly renewable as uranium is going to run out)
Just to finish off I want to mention why in my opinion governments aren’t using renewable energy sources as much. If you look at the demographic of those who oppose the implementation of renewable energy sources are mainly about 60 or above, so all fairly old. So in my opinion their trail of thought is; “I’m going to be dead by the time fossil fuel runs out, so why should I have to live my last 20 or so years with the government concentrating on things that I do not care about, on things that are not going to be of any use for me, they should spend their time and money on making it easier for me to go to bingo etc.” So to some up they don’t give a shit about what we, the younger generations are going to have to deal with, and the government are too scared to state this as they will lose the older voters who make up quite a bit of the voting population.
So wake up. We need to use renewable energy sources. Now
DIY Whiteboard with Hidden Storage

I used to have an old IKEA Micke desk lying around and I have already repurposed the drawers into a little display shelf, but for the desktop I decided to something a bit more simple, to use it as a Whiteboard as it is a high gloss desktop. But only recently did I think to use the back of it as a place to store some of my tools and other miscellaneous things.
So What I decided to do was to attach some metal chain onto it and the wall so I could lower it and put my tools on it, and here’s how I did it:
What you will need:
1 High gloss tabletop or an ordinary whiteboard
4 Hooks
1 Wall plug
Metal chain roughly 1 Meter
1 Split pin or Zip tie
A drill
A Saw
Screws for mounting tools or more hooks.
Cardboard (Optional)
Sticky tape (Optional)
Step 1
Mark up where your hole for the hook in the wall will go, this will be in the middle of the whiteboard so make sure it fits, then once you’ve marked the hole drill it and insert the wall plug and the hook.

Step 2
Get you metal chain and hook it onto your hook in the wall then work out how long you want it to be or how far you want the whiteboard to tilt out (Mine is 40 Cm). Once you’ve worked that out mark where you want it cut and cut it.
Then with the rest of the chain measure it, then half it. Once you have that mark that on the chain and cut it.

Step 3
Find the middle of your whiteboard and make a mark about half a centimetre down from that point on the back, non-glossy side. Then at the left and right side of the whiteboard make a point about 4 cm in and about half a centimetre from the top. Once you have done that drill those holes and screw in the hooks.

Step 4
Now hook the bit of chain that will go in the middle to the wall and to the hook in the middle of the whiteboard, and lower the whiteboard (The one hook can support the whiteboard but for extra stability I added 2 more hooks). Then hook the two other chains onto the two other hooks. Then make those two side chains meet on the large middle chain and put the split pin through all three chains at that point and turn the sides up or do up the zip tie.

Step 5 (Optional wall protectors)
Because I didn’t want to leave marks on the wall from where the whiteboard hooks were I decided to make some quick and simple wall protectors. All you need to do is get a piece of cardboard roughly 3X1 Cm and if you want quickly paint them and stick them up with sticky tape in the position where the hooks would lean against the wall.
Step 6 (Tool hanging)
The way you hang your tools is completely up to you, you could attach a pegboard to it or even try and make some kind of French Cleat storage system but for me I just put some screws in from which I will hang my tools, as you can see from the picture and I also stole an Idea from Casey Neistat which is outlining the tools with a permanent marker, as by doing this it helps you remember where each tools goes, and I also quickly stapled a packet of staples for my staple gun which now is one of my favourite tools.

Thank you for reading and if you have any questions or improvements then please do comment. ☺
DIY Paper dispenser

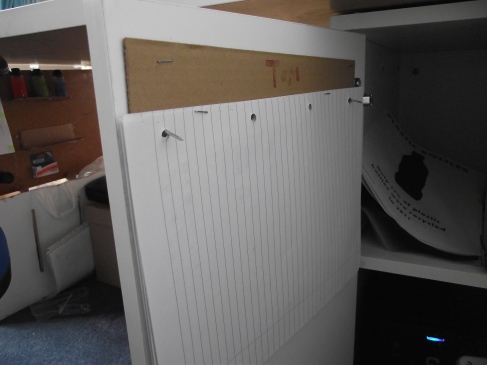
I have a cabinet under my desk but lately it has become more of a rubbish bin so I thought I might as well try and sort the mess out, so I can actually use the space.
So I decided to make a quick lined paper dispenser to try and start clearing out the mess
What you will need
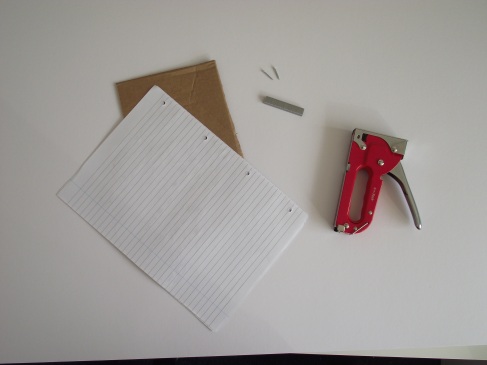
- A piece of cardboard that is long enough to reach both the far holes in the paper
- Paper with punched holes
- 2 Nails or drawing pins
- Staple gun with staples
Step 1
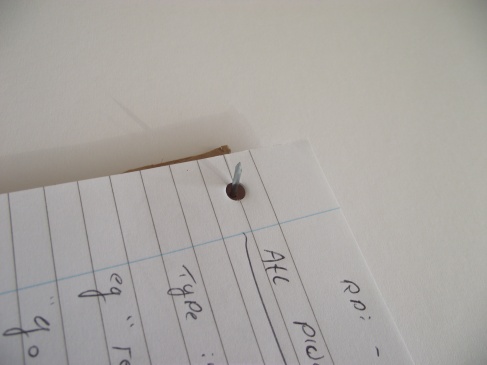
Get your piece of cardboard and make sure the holes on the paper both appear on the cardboard. Then push the nails through the holes in the paper, all the way through the cardboard.
Step 2
Then take the paper off and turn the cardboard the other way around and put the paper back on the cardboard
Step 3
Then you need to staple the paper to the cardboard, and try and staple the paper fairly high as you don’t want the tear marks to be too big.

Step 4
As I’m trying to organise my desk cabinet I decided to attach my paper dispenser to the door of it. So to attach it I just quickly stapled it to the door
If you have any questions or ideas to improve this then please leave a comment.
